Introduction
In today's digital landscape, securing sensitive data is more crucial than ever. Enabling BitLocker encryption on your devices not only protects your information from unauthorized access but also ensures compliance with security regulations. By integrating BitLocker with Intune and backing up the recovery keys to Azure Key Vault, you can streamline management and enhance data protection across your organization.
In this post, we'll explore how to set up BitLocker efficiently, ensuring your data remains safe and easily recoverable.
⚠️ Important: It's critical to back up your recovery keys because once a device is deleted from Entra ID, the BitLocker recovery key is deleted as well.
In this article, we will configure BitLocker using Microsoft Intune and back up the recovery keys to Azure Key Vault using Azure Automation Account.
Let's Start!
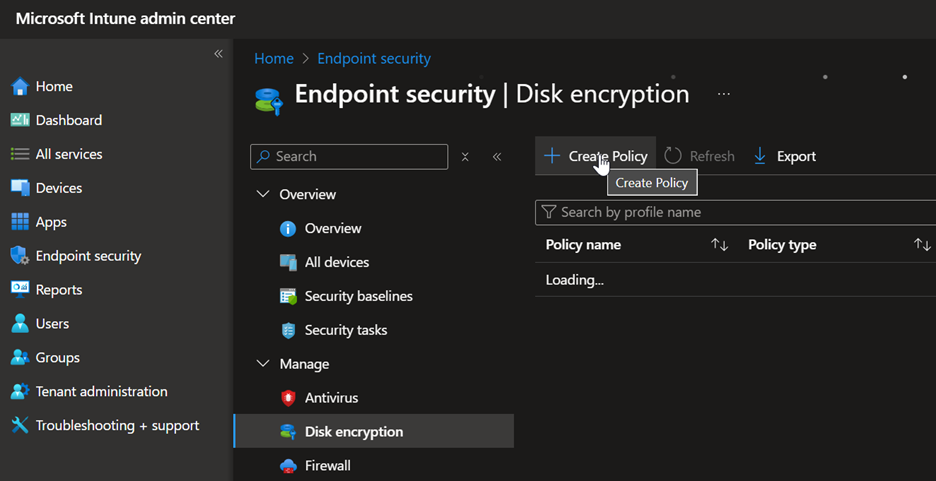
Step 1: Create BitLocker Policy in Intune
First, go into the Intune Portal or Microsoft Endpoint Manager Portal, head to Endpoint Security → Disk encryption → Create Policy:
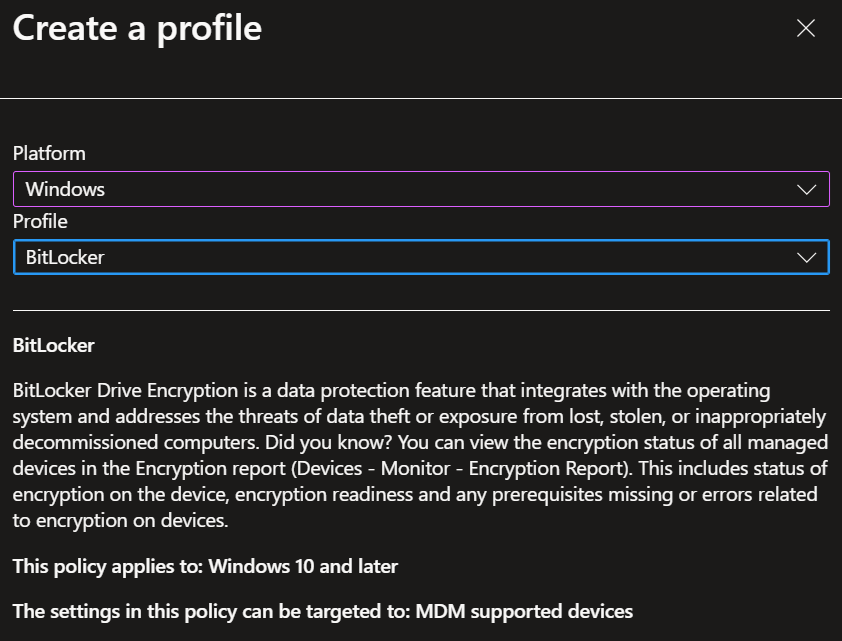
Select the Platform and choose a profile like in the picture below and click Create at the bottom:
- 1. Give the policy a name (e.g., BitLocker Policy), add a description if you'd like to, and click Next.
- 2. Next, we'll configure our BitLocker settings, choose Enable in the first option, and click Next. We'll configure the rest of the settings later.
- 3. On the Scope Tags page click Next.
- 4. In the Assignments page, you can assign your test group of devices to receive the policy or just click Next (we will assign the policy after configuring all the settings we need).
- 5. Click Save.
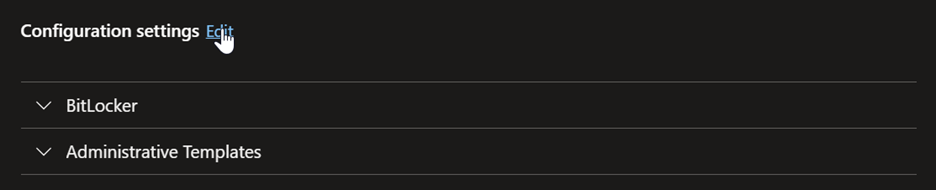
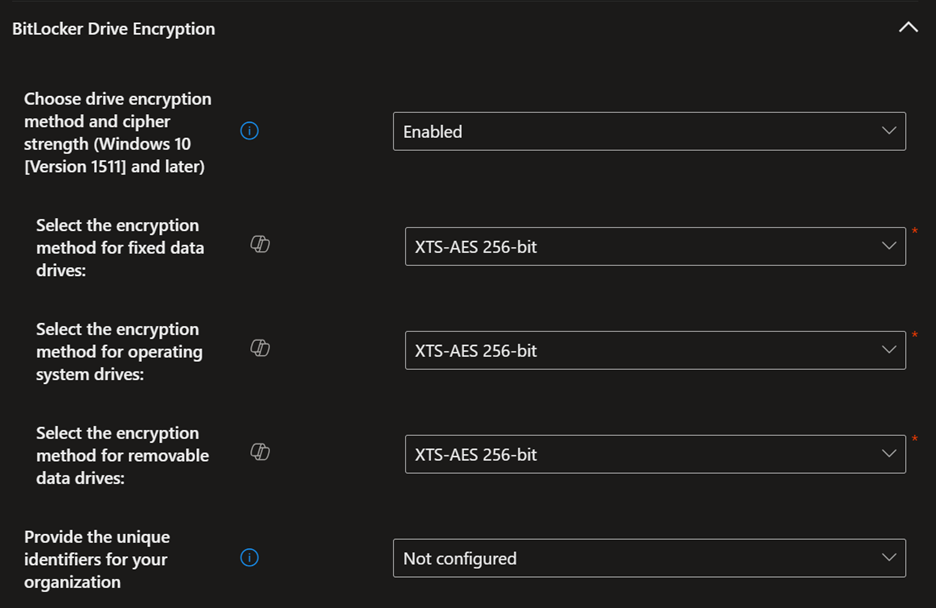
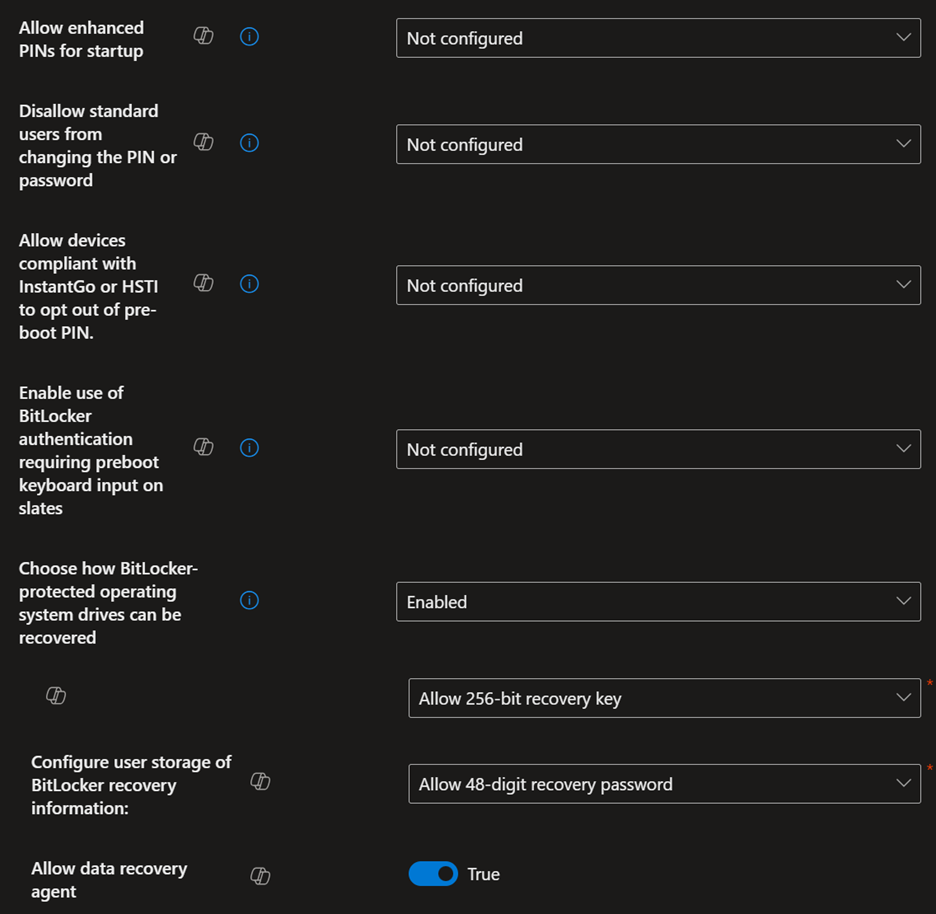
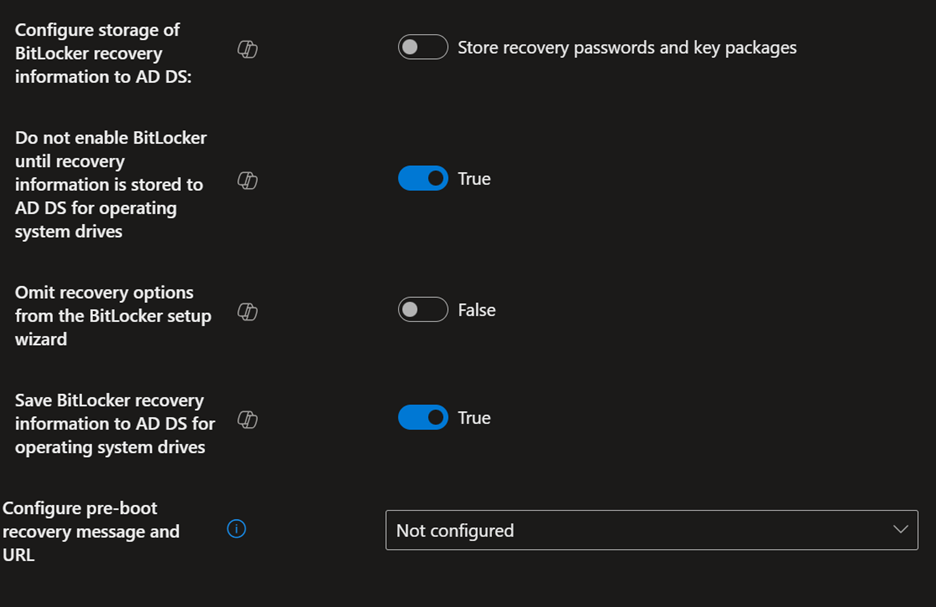
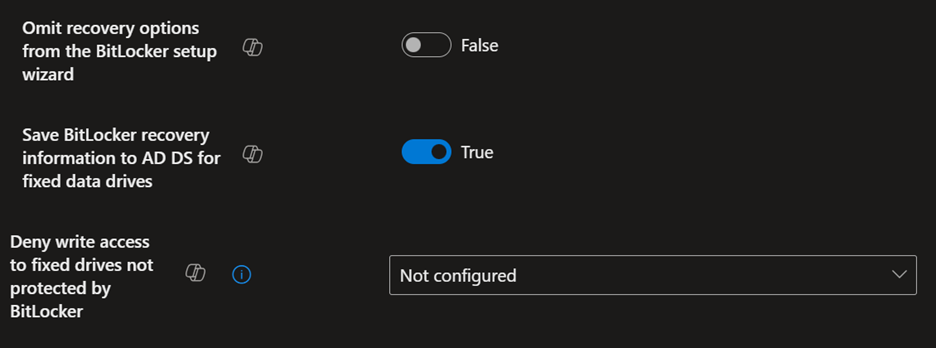
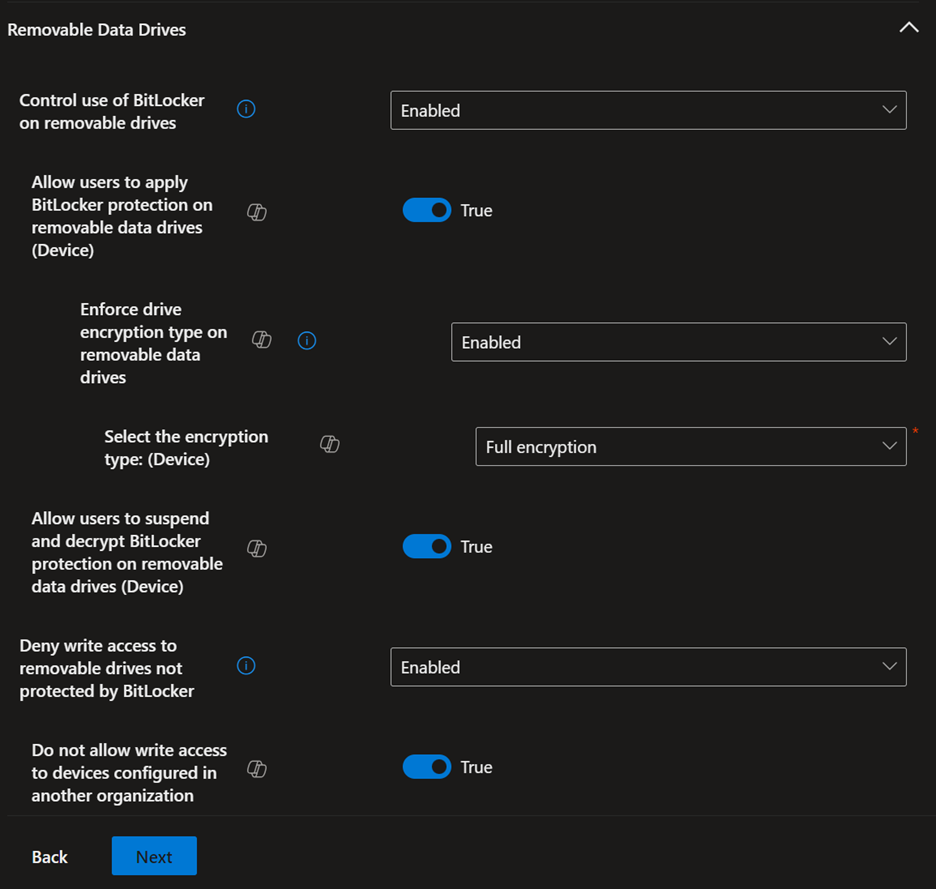
Step 2: Configure BitLocker Settings
Now let's configure all the needed settings for the Policy. Click on the policy you just created, scroll down, and click on the Edit button next to the Configuration settings:
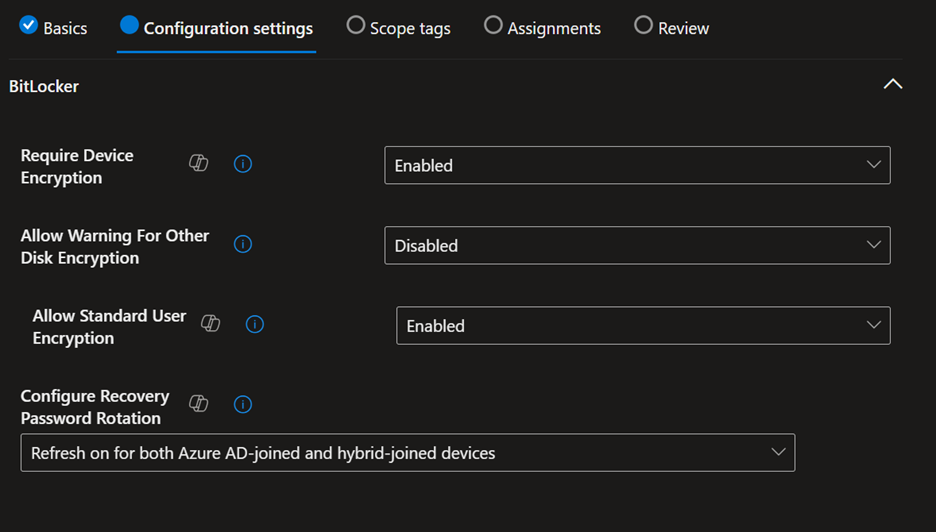
Here are the settings that work best for my organization; there might be slight modifications needed to make it work best for you:


Backing Up Recovery Keys to Azure Key Vault
Now it's time to back up those recovery keys to an Azure Key Vault. This process involves several steps:
- 1 Assign permissions to your Automation Account Managed Identity to read the BitLocker keys and store them in the Key Vault.
- 2 Create a Key Vault and assign permissions to the managed identity.
- 3 Use my script on GitHub: Backup-BitlockerKeys-From-EntraID-To-AzureKeyVault.ps1
- 4 You can run this script in an Azure Automation account on a schedule; any duplicates will not be saved.
- 5 An article by Ram Apter about searching the key vault for recovery keys: Searching Azure Key Vault for Recovery Keys
Assign Permissions to Automation Account
Use this script to assign permissions to your Automation account managed identity. Make sure you fill in your tenant ID and the name of the Enterprise Application that is created when you enabled the System assigned Managed-Identity.
Note: You can find the Enterprise Application by taking the Object (principal) ID shown under the Identity section of the Automation account and searching it on Entra ID. But it would be the same name of the Automation Account in most cases.
$tenantID = "123456-1234-5678-1234-12345678"
$graphAppId = "00000003-0000-0000-c000-000000000000"
$permissions = @("Device.Read.All", "BitlockerKey.Read.All")
$managedIdentities = @("EnterpriseApplicationName")
Connect-MgGraph -TenantId $tenantID -Scopes "AppRoleAssignment.ReadWrite.All", "Directory.Read.All"
$sp = Get-MgServicePrincipal -Filter "appId eq '$graphAppId'"
$managedIdentities | ForEach-Object {
    $msi = Get-MgServicePrincipal -Filter "displayName eq '$_'"
    $appRoles = $sp.AppRoles | Where-Object {($_.Value -in $permissions) -and ($_.AllowedMemberTypes -contains "Application")}
    $appRoles | ForEach-Object {
        $appRoleAssignment = @{
            "PrincipalId" = $msi.Id
            "ResourceId" = $sp.Id
            "AppRoleId" = $_.Id
        }
        New-MgServicePrincipalAppRoleAssignment -ServicePrincipalId $appRoleAssignment.PrincipalId -BodyParameter $appRoleAssignment -Verbose
    }
}
Disconnect-MgGraphCreate the Key Vault and Assign Permissions
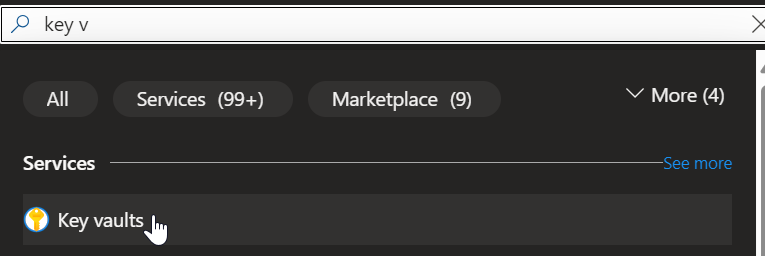
- 1. Go to the Azure Portal and search for Key Vault in the top search bar.
- 2. Click on Create, select the subscription, resource group, region, and give it a name (keep the pricing tier on Standard).
- 3. Assign the "Key Vault Secrets Officer" role to your Automation Account Managed Identity.
- 4. Assign the "Key Vault Secrets Officer" role to your admin user so you can verify the script worked and retrieve the recovery keys when needed.
Recovery Key Format:
The recovery keys are saved in this format: "ComputerName-BitLockerKeyID-<RecoverykeyID>"
Final Steps
- 1. Copy the script from GitHub: Backup-BitlockerKeys-From-EntraID-To-AzureKeyVault.ps1
- 2. Create a runbook and paste the script there, editing the Key Vault name and subscription name.
- 3. Use the article from Ram Apter Searching Azure Key Vault for Recovery Keys so you can retrieve the recovery keys easily when needed.
Success!
Now you can run the Automation runbook that will back up all the BitLocker keys in Entra ID to your Key Vault. This ensures that your recovery keys are securely stored and accessible when needed, even if devices are removed from Entra ID.