This article provides a step-by-step guide on how to create an Azure Automation account, configure it with managed identity authentication, and schedule a PowerShell script that detects and manages Exchange Online mailboxes exceeding specific storage thresholds.
Prerequisites
- Azure Subscription: Access to an Azure subscription to create resources.
- Exchange Online Management Module: Familiarity with the Exchange Online Management module for PowerShell.
Step 1: Create an Azure Automation Account
Sign in to Azure Portal
Go to Azure Portal.
Create a New Automation Account
-
1
In the left navigation pane, click on Create a resource.
-
2
Search for Automation and select Automation Account.
-
3
Click on Create.
-
4
Fill in the required fields:
Name: Enter a unique name for your Automation Account.Subscription: Select your Azure subscription.Resource Group: Create a new resource group or select an existing one.Location: Choose a location (e.g., East US). -
5
Click Review + Create and then Create.
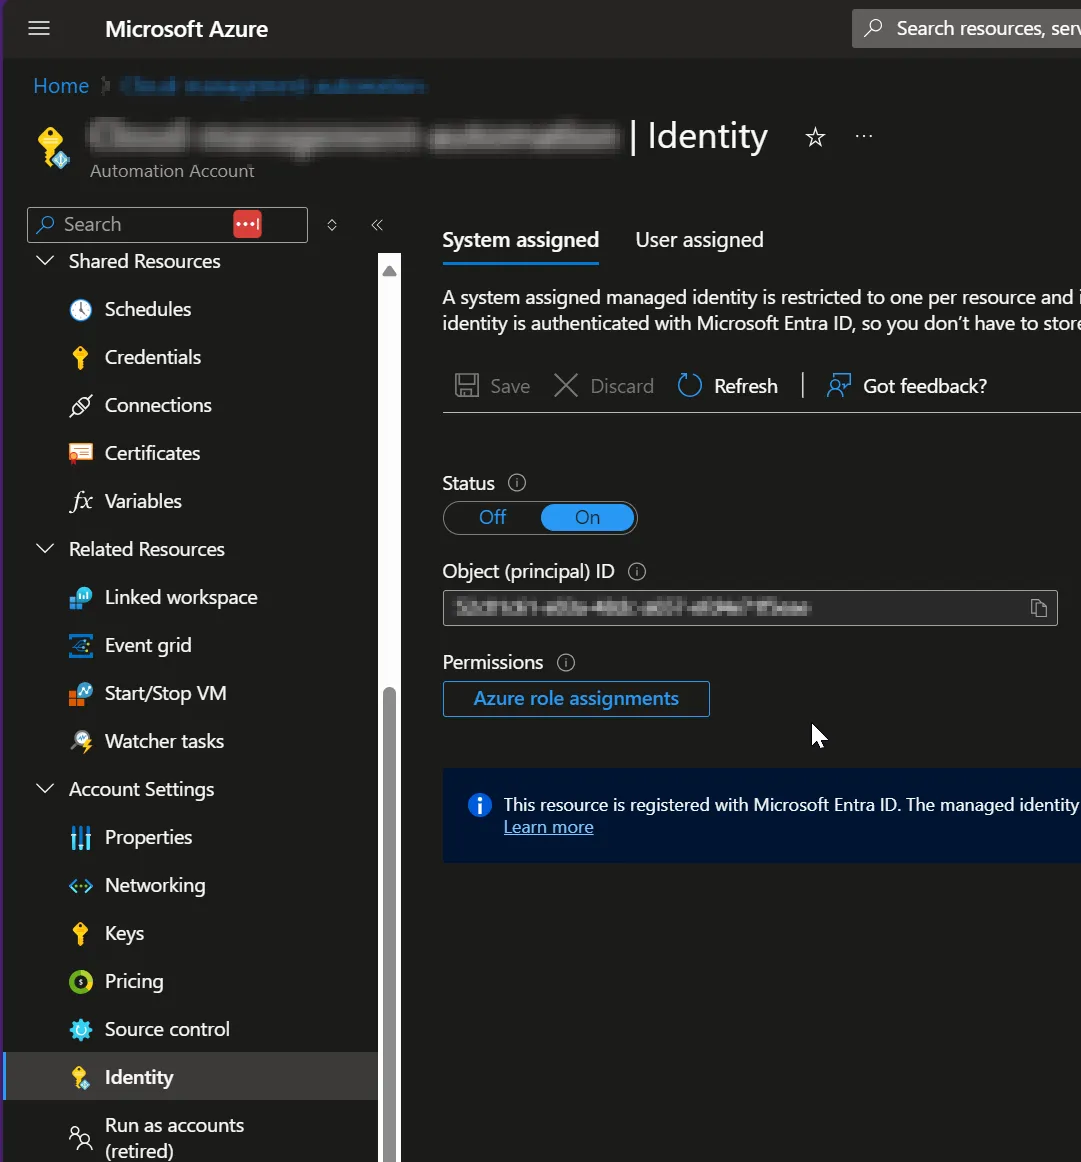
Step 2: Enable Managed Identity
Navigate to Your Automation Account
Once created, go to the Automation Account you just set up.
Enable System-Assigned Managed Identity
-
1
In the left menu, click on Identity.
-
2
Under the System assigned tab, switch the status to On and click Save.
Important Notes
-
Make sure you fill in your tenant ID and the name of the Enterprise Application that is created when you enabled the System assigned Managed-Identity.
You can find it by taking the Object (principal) ID shown under the Identity section of the Automation account and searching it on Entra ID. But it would be the same name of the Automation Account in most cases.
-
The Microsoft Graph App ID (
$graphAppIdin the script) is the same for all tenants, keep it as is. -
The script assigns the required permissions from Microsoft Graph on our Automation Account managed-identity. View permissions documentation
Automation Account Identity Configuration
Connect-MgGraph -Scopes AppRoleAssignment.ReadWrite.All,Application.Read.All

$AppRoleID = "dc50a0fb-09a3-484d-be87-e023b12c6440"

$ResourceID = (Get-MgServicePrincipal -Filter "AppId eq '00000002-0000-0ff1-ce00-000000000000'").Id

$managedIdentities = @("EnterpriseApplicationName")

$msi = Get-MgServicePrincipal -Filter "displayName eq $managedIdentities"

New-MgServicePrincipalAppRoleAssignment -ServicePrincipalId $msi.Id -PrincipalId $msi.Id -AppRoleId $AppRoleID -ResourceId $ResourceID
Step 3: Create a Runbook
Create a New Runbook
-
1
In your Automation Account, click on Runbooks.
-
2
Click on + Create a runbook.
-
3
Enter a name for the runbook, select PowerShell as the type, and click Create.
Copy Script from GitHub
Copy and paste the script from GitHub: EXOMailboxSize.ps1
-
In the runbook editor, paste the PowerShell script (ensure it's configured for managed identity).
-
Update email settings, threshold values, and any other required parameters.
Save and Publish the Runbook
Click Save and then Publish the runbook.
Step 4: Schedule the Runbook
Create a Schedule
-
1
In your runbook, click on Schedules.
-
2
Click on + Add a schedule.
-
3
Select Create a new schedule or use an existing one.
-
4
If creating a new schedule, specify the name, start time, and frequency (e.g., daily, weekly).
-
5
Click Create.
Link the Schedule to the Runbook
- After creating the schedule, return to the runbook.
- Click on Link to schedule.
- Select the schedule you just created and click OK.
Step 5: Test the Runbook
Start the Runbook Manually
- Go back to the runbook and click Start to test it manually.
- Monitor the job status and check for any errors in the job output.
Check Email Notifications
Ensure that the email notifications are sent correctly and that mailbox management actions are performed as expected.
Conclusion
You have successfully set up an Azure Automation account, configured it with managed identity authentication, and scheduled a PowerShell script to manage Exchange Online mailboxes. This setup allows for automated mailbox management, ensuring optimal usage of your Exchange Online resources.
For further questions or support, feel free to reach out!