Home About Contact Latest Articles Close

Auto Logon & Intune Kiosk Policy Deployment Guide

Authors: Ofir Gavish and Eitan Talmi

Introduction

Picture this: You're standing in front of a public terminal at the airport, trying to check your flight status, when suddenly someone's grandmother starts trying to install Candy Crush on it. Sound familiar? That's exactly why kiosk mode exists - to save us all from the chaos of unrestricted public devices!

This guide walks you through the process of configuring a Windows 10/11 device to automatically log in and operate in kiosk mode using Microsoft Intune. Think of kiosk mode as putting your device in a digital straightjacket - but in a good way! It's like having a bouncer for your computer that only lets one specific app into the VIP section.

Kiosk mode is ideal for scenarios where you want to lock down a device to a single app experience, particularly for public-facing terminals, dedicated workstations, or anywhere you need to prevent users from accidentally (or intentionally) turning your carefully configured device into their personal playground. After all, nobody wants to explain to their boss why the lobby check-in kiosk is now running TikTok!

This streamlined approach uses Intune's built-in kiosk policies and Settings Catalog for a simplified deployment process - because who has time for complicated configurations when there are devices to manage and coffee to drink?

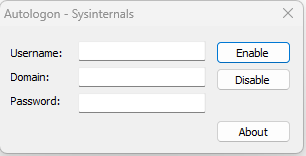
Step 1: Configure Auto Logon

  1. Download the Autologon Tool from Microsoft Sysinternals.
  2. Run Autologon:
    • Launch Autologon.exe as Administrator.
    • For Entra ID joined computers, configure the following:
    • AutoLogon SysInternals
    • Technical Insight: This utility writes the credentials to the registry in a secure manner under:
      HKLM\SOFTWARE\Microsoft\Windows NT\CurrentVersion\Winlogon
      This enables seamless user login on boot. For Entra ID joined devices, the domain must be specified as "AzureAD" to properly authenticate against the cloud directory. The autologon process bypasses the Windows credential prompt by providing cached credentials directly to the Local Security Authority (LSA).

Step 2: Disable InPrivate Browsing

  1. In Intune, navigate to Devices > Configuration
  2. Click Create > New Policy
  3. Select the following configuration:
    • Platform: Windows 10 and later
    • Profile type: Settings Catalog
  4. Provide a descriptive name for the policy and click Next
  5. Search for and add "Configure InPrivate mode availability (User)" under the Edge category
  6. Set the configuration to "InPrivate mode disabled"
  7. Assign the policy to a group containing the target user
  8. Click Create to deploy the policy

Note: Technical Insight: This Settings Catalog policy leverages the Microsoft Edge Administrative Templates to configure the InPrivate browsing behavior via the Windows Policy CSP. Behind the scenes, Intune sends a SyncML command targeting the Policy CSP with the OMA-URI:

./Device/Vendor/MSFT/Policy/Config/Browser/ConfigureOpenMicrosoftEdgeWith
The Policy CSP then applies this configuration by modifying the appropriate registry keys under:
HKLM\SOFTWARE\Policies\Microsoft\Edge
This effectively implements Group Policy equivalent functionality through MDM.

Step 3: Create the Kiosk Policy

  1. In Intune, navigate to Devices > Configuration
  2. Click Create > New Policy
  3. Select the following configuration:
    • Platform: Windows 10 and later
    • Profile type: Templates
    • Template: Kiosk
  4. Click Create
  5. Provide a descriptive name for the policy and click Next
  6. Configure the kiosk settings:
    • Select a kiosk mode: Single app, full-screen kiosk
    • User logon type: Microsoft Entra user, then click Add and select the target user
    • Application type: Add Microsoft Edge Browser
    • Edge Kiosk URL: Enter the URL you want to browse to
    • Microsoft Edge kiosk mode type: Public Browsing (InPrivate)
    • Refresh browser after idle time: 30 minutes
  7. Assign the policy to a group containing the target user
  8. Click Create to deploy the policy

Note: Technical Insight: This template-based kiosk policy utilizes the AssignedAccess CSP to configure single-app kiosk mode. When deployed, Intune generates a SyncML payload targeting the OMA-URI:

./Device/Vendor/MSFT/AssignedAccess/Configuration
The AssignedAccess CSP processes this configuration and creates a restricted shell environment where only Microsoft Edge can run. This involves modifying the Windows Shell Launcher service configuration, creating dedicated user session isolation, and implementing application allowlisting at the kernel level. The automatic refresh capability is managed through scheduled tasks that monitor user idle time and trigger browser restart operations.

Security Warning

Important: Microsoft's documentation clearly states that "The kiosk profile doesn't load for members in the local admin group." Adding kiosk users to the local administrators group defeats the security purpose of kiosk mode and should be avoided in production environments.

Handling Software Restriction Errors

If you encounter software restriction errors, consider these secure alternatives instead of making the user a local administrator:

Option 1: App-Specific Allowlisting (Recommended)

  1. Navigate to Intune > Devices > Configuration > Create Policy
  2. Select Windows 10 and later > Templates > Windows Defender Application Control
  3. Configure specific application exceptions for required diagnostic tools
  4. Target the policy to the same device group as your kiosk policy

Option 2: Custom OMA-URI Configuration

Use a custom OMA-URI to modify the AssignedAccess configuration with specific app allowlists:

        OMA-URI: ./Device/Vendor/MSFT/AssignedAccess/Configuration
Data Type: String
Value: [XML configuration with specific app allowlist for diagnostic tools]
    

Option 3: Breakglass Account (Emergency Access)

Instead of making the kiosk user an administrator, create a separate break-glass local administrator account for diagnostic purposes:

        # Create break-glass admin account (run as administrator)
net user kioskadmin ComplexPassword123! /add
net localgroup Administrators kioskadmin /add
net user kioskadmin /active:no

# Enable only when needed for diagnostics
net user kioskadmin /active:yes
    

Legacy Workaround (Not Recommended for Production)

⚠️ Use only in testing environments: If you absolutely must make the user a local administrator for troubleshooting, understand that this compromises kiosk security:

        net localgroup Administrators "AzureAD\[email protected]" /add
    

Remember to remove admin privileges immediately after diagnostics are complete.

Real-World Implementation Experience

Authors' Note

Practical Reality: Despite our best efforts to implement kiosk mode following security best practices, we encountered persistent software restriction errors that prevented the kiosk from functioning properly. We attempted multiple approaches including custom OMA-URI configurations, application allowlisting policies, and Windows Defender Application Control settings.

After extensive testing and troubleshooting, none of the secure alternatives worked reliably in our environment. Given that our kiosk workstations are deployed exclusively within secured office premises (not public-facing), we made the pragmatic decision to use the local administrator approach as an acceptable risk trade-off.

Lesson learned: Sometimes theoretical best practices need to be balanced against real-world implementation constraints and risk tolerance.

Diagnosing Software Restriction Errors

When you encounter software restriction errors in kiosk mode, follow this systematic diagnostic approach:

Step 1: Identify the Error Source

Check these primary locations for error details:

        # Check Windows Event Logs
Get-WinEvent -LogName "Microsoft-Windows-AppLocker/EXE and DLL" | Where-Object {$_.LevelDisplayName -eq "Error"} | Select-Object TimeCreated, Id, LevelDisplayName, Message

# Check Application Event Log
Get-EventLog -LogName Application -Source "Application Error" -Newest 10

# Check System Event Log for kiosk-related errors
Get-EventLog -LogName System | Where-Object {$_.Message -like "*kiosk*" -or $_.Message -like "*assigned*"} -Newest 10
    

Step 2: Analyze AssignedAccess Configuration

Verify the current kiosk configuration:

        # Check current AssignedAccess configuration
Get-AssignedAccess

# View detailed kiosk configuration
Get-ItemProperty -Path "HKLM:\SOFTWARE\Microsoft\Windows\AssignedAccessManagement\AssignedAccessSettings" | Format-List

# Check for conflicting policies
Get-AppLockerPolicy -Effective | Format-List

# Verify user account configuration
whoami /groups
net user $env:USERNAME
    

Step 3: Test Application Launch Manually

Attempt to launch the restricted application manually to isolate the issue:

        # Test Microsoft Edge launch (replace with your kiosk app)
Start-Process -FilePath "msedge.exe" -ArgumentList "--kiosk=https://your-url.com" -Wait -PassThru

# Check process execution policies
Get-ExecutionPolicy -List

# Verify application installation and accessibility
Get-AppxPackage -Name "*edge*" | Select-Object Name, InstallLocation, Status
Test-Path "C:\Program Files (x86)\Microsoft\Edge\Application\msedge.exe"
    

Step 4: Generate Comprehensive Diagnostic Report

Create a detailed report for further analysis:

        # Create diagnostic output directory
$diagPath = "C:\temp\KioskDiagnostics"
New-Item -Path $diagPath -ItemType Directory -Force

# Export all relevant configurations
Get-AssignedAccess | Out-File "$diagPath\AssignedAccess.txt"
Get-AppLockerPolicy -Effective -Xml | Out-File "$diagPath\AppLockerPolicy.xml"
Get-LocalUser | Out-File "$diagPath\LocalUsers.txt"
Get-LocalGroupMember -Group "Administrators" | Out-File "$diagPath\Administrators.txt"

# Export recent event logs
Get-WinEvent -LogName "Microsoft-Windows-AppLocker/EXE and DLL" -MaxEvents 50 | Export-Csv "$diagPath\AppLockerEvents.csv"
Get-EventLog -LogName Application -Newest 100 | Export-Csv "$diagPath\ApplicationEvents.csv"

# Export system information
systeminfo | Out-File "$diagPath\SystemInfo.txt"
gpresult /h "$diagPath\GroupPolicy.html"

Write-Output "Diagnostic files saved to: $diagPath"
    

Common Software Restriction Causes

Temporary Workarounds for Diagnosis

Use these approaches to temporarily bypass restrictions for troubleshooting:

        # Temporarily disable AppLocker (requires restart)
Set-AppLockerPolicy -PolicyObject (New-Object Microsoft.Security.ApplicationId.PolicyManagement.PolicyModel.AppLockerPolicy)

# Boot into Safe Mode for unrestricted access
bcdedit /set {current} safeboot minimal

# Run application with elevated privileges for testing
runas /user:Administrator "msedge.exe --kiosk=https://your-url.com"

# Temporarily disable Windows Defender real-time protection
Set-MpPreference -DisableRealtimeMonitoring $true
    

Important: Remember to re-enable security features after diagnostics.

Advanced Configuration and Policy Processing

SyncML Command Flow

When you deploy these policies, Intune orchestrates a complex communication flow between the cloud service and the target device:

  1. Policy Creation: Intune converts your policy selections into SyncML XML commands
  2. Device Check-in: The enrolled device polls Intune (typically every 8 hours or when manually synced)
  3. Command Delivery: Intune sends SyncML commands via HTTPS to the device's management endpoint
  4. CSP Processing: The Windows management client routes commands to appropriate CSPs
  5. Configuration Application: CSPs apply settings through Windows APIs and registry modifications
  6. Status Reporting: The device reports success/failure status back to Intune via SyncML response

Monitoring Policy Application

You can monitor the policy application process through several mechanisms:

Advanced Kiosk Customizations

For organizations requiring additional customization beyond the standard template, you can leverage custom OMA-URI configurations:

        OMA-URI: ./Device/Vendor/MSFT/AssignedAccess/Configuration
Data Type: String (XML file)
Purpose: Advanced kiosk configuration with custom app allowlists and shell restrictions
    

Security Considerations

Modern kiosk implementations in Windows 10/11 leverage several security mechanisms:

Kiosk Diagnostics and Troubleshooting

When Apps Are Restricted in Kiosk Mode

The LinkedIn commenter raises an excellent point about diagnostic challenges. Here's how to handle situations where kiosk restrictions prevent access to diagnostic tools:

Safe Diagnostic Approaches

  1. Remote Diagnostics via Intune:
    • Use Intune's remote actions: Restart, Sync, Collect diagnostics
    • Access device compliance reports and policy status remotely
    • Review Intune device logs without local access
  2. Boot to Safe Mode:
    • Restart the device and boot into Safe Mode to bypass kiosk restrictions
    • Access diagnostic tools and system settings
    • Apply fixes and reboot to normal mode
  3. Local Administrator Account (Separate from Kiosk User):
    • Create a dedicated local admin account for maintenance
    • Keep this account disabled normally
    • Enable only when diagnostic access is needed

Preventive Monitoring

Instead of reactive troubleshooting, implement proactive monitoring:

Common Diagnostic Scenarios and Solutions

App Installation Issues

        # Check app installation status via PowerShell (run remotely)
Get-AppxPackage -Name "*MicrosoftEdge*" | Select Name, Version, Status
Get-WmiObject -Class Win32_Product | Where-Object {$_.Name -like "*Edge*"}
    

Policy Application Verification

        # Check AssignedAccess configuration
Get-AssignedAccess
Get-ItemProperty -Path "HKLM:\SOFTWARE\Microsoft\Windows\AssignedAccessManagement\AssignedAccessSettings"

# Verify kiosk mode status
rsop.msc  # (Run from break-glass admin account)
    

Network Connectivity Issues

        # Test connectivity (can be run via remote PowerShell)
Test-NetConnection -ComputerName "portal.office.com" -Port 443
nslookup login.microsoftonline.com
ping 8.8.8.8
    

Troubleshooting Common Issues

Policy Application Failures

If policies fail to apply, investigate these common causes:

Kiosk Mode Issues

Common kiosk-specific problems and solutions:

Diagnostic Commands

        # Export MDM logs for analysis
mdmdiagnosticstool.exe -out C:\temp\MDMDiag

# Check AssignedAccess status
Get-AssignedAccess

# View current kiosk configuration
Get-Content "HKLM:\SOFTWARE\Microsoft\Provisioning\Diagnostics\ConfigManager\AssignedAccess"
    

Conclusion

This comprehensive approach to implementing kiosk mode via Intune demonstrates the sophisticated underlying technologies that power modern device management. Understanding the SyncML protocol, CSP architecture, and OMA-DM standards provides administrators with the knowledge needed to troubleshoot issues, implement advanced customizations, and optimize kiosk deployments for specific use cases.

The combination of Intune's policy templates with direct CSP access through custom OMA-URI configurations offers both simplicity for standard deployments and flexibility for complex requirements. By leveraging Windows' built-in security containers and application isolation mechanisms, modern kiosk implementations provide robust protection while maintaining ease of management.

For production environments, establish proper monitoring procedures using the diagnostic tools mentioned above, implement staged rollouts to pilot groups, and maintain documentation of any custom configurations for future reference and troubleshooting scenarios.