Introduction
So recently we had the need to configure mapping to Azure Storage accounts using Intune. All the attempts using remediation scripts failed and we didn't want to go down the "Scheduled tasks" route.
The solution? A clever two-part approach that combines the power of platform scripts with custom ADMX policies!
The Two-Step Strategy
Platform Script
Use a platform script to securely add the storage account credentials to Windows Credential Manager
Custom ADMX + OMA-URI
Deploy a custom ADMX template with OMA-URI policy to automatically map the network drives
This approach bypasses the limitations of remediation scripts while providing a reliable, enterprise-grade solution for network drive mapping!
Step 1: The Platform Script
Adding Storage Account Credentials
If we take a look at the script we can get in the Azure portal for mapping storage account file shares, one of the commands is used to enter the credentials (username and account key) into the user's credentials stored in the endpoint. You can see it in the Windows Credential Manager under Windows Credentials.
Find the following lines in the Azure Storage script:
# Save the password so the drive will persist on reboot
cmd.exe /C "cmdkey /add:`"storageaccountname.file.core.windows.net`" /user:`"localhost\storageaccountname`" /pass:`"xxxxxxXXXXXXXXXXXXxxxxx+xxxxxxxxxxxxxxxxxxxxxxxXXXXXXXXXxxxxxxxxXXXXxxx==`"
Enhanced Script with Connectivity Check
Copy the credentials command to a new script file, and add this enhanced code with connectivity testing:
$connectTestResult = Test-NetConnection -ComputerName storageaccountname.file.core.windows.net -Port 445
if ($connectTestResult.TcpTestSucceeded) {
    # Save the password so the drive will persist on reboot
    cmd.exe /C "cmdkey /add:`"storageaccountname.file.core.windows.net`" /user:`"localhost\storageaccountname`" /pass:`"xxxxxxXXXXXXXXXXXXxxxxx+xxxxxxxxxxxxxxxxxxxxxxxXXXXXXXXXxxxxxxxxXXXXxxx==`""
} else {
    Write-Output -Message "Unable to reach the Azure storage account via port 445. Check to make sure your organization or ISP is not blocking port 445, or use Azure P2S VPN, Azure S2S VPN, or Express Route to tunnel SMB traffic over a different port."
}
Important: Remember to change the command line with your actual storage account credentials from your Azure portal script.
Deploy the Platform Script
Now we need to deploy this script as a Platform script in Intune:
Configuration Steps
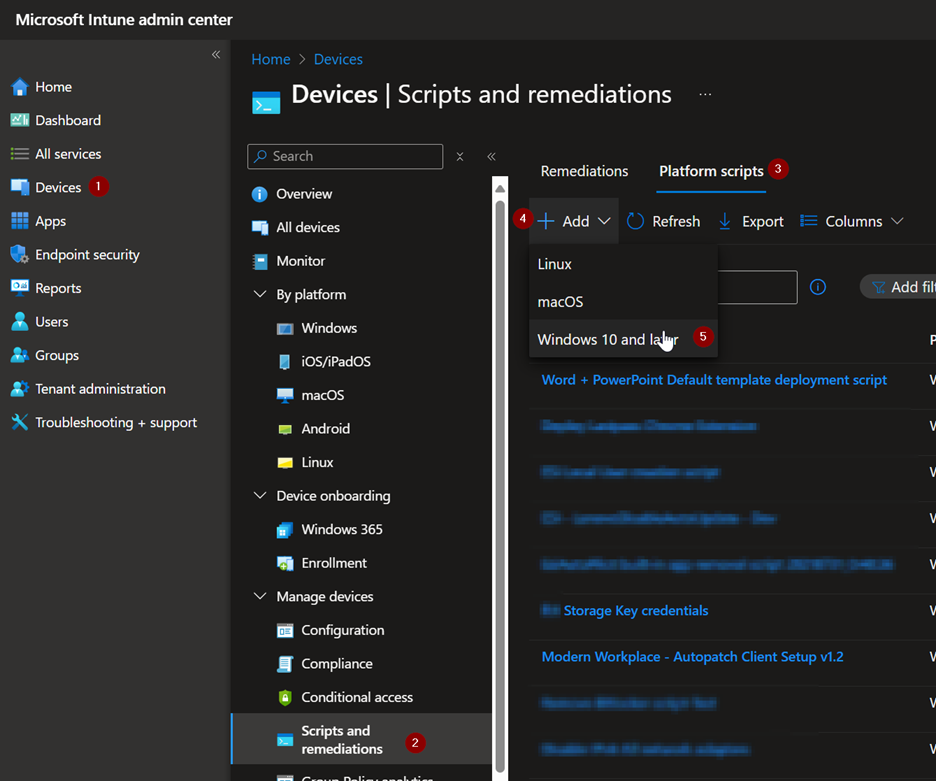
- 1 Head over to the Intune portal and navigate to Devices → Scripts and remediations → Platform scripts
- 2 Click Add and choose Windows 10 and later
- 3 Give it a name like "MSCloudNinja Storage Key credentials" and add a description
Intune Platform Scripts Setup
Script Configuration Settings
Select the script file you just saved and configure these settings:
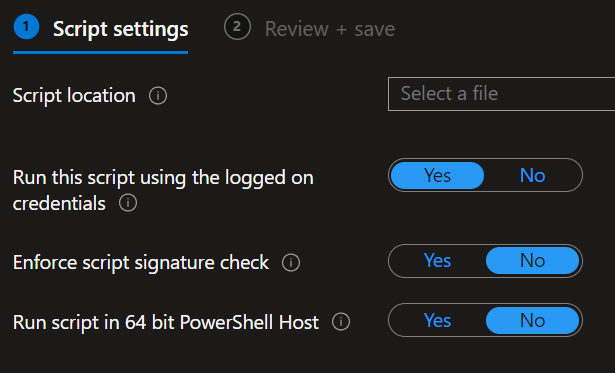
Platform Script Configuration Settings
Final Steps: Assign the script to the related group, click Next, and then Add.
Step 2: Custom ADMX + OMA-URI Policy
The Magic Behind Drive Mapping
Great! Now we can start working on the Configuration Policy with our Custom ADMX to actually map the network drive. This is where the real magic happens!
Here's a link to the XML that I use to enable mapping for the letters Q and Z, but you can change it to your desired letters or add more letters.
Create the Custom OMA-URI Policy
- 1 In the Intune portal go to Devices → Configuration
- 2 Under Policies click Create → New Policy
-
3
Configure policy settings:
- Platform: Windows 10 and later
- Profile type: Templates
- Template: Custom

Intune Custom Policy Configuration
Configure the ADMX Template
Give it a meaningful name and description, then click Next. Now let's configure the ADMX template injection:
ADMX Template Injection
Click the Add button and use the following configuration:
DriveMapping.admx
String
ADMX template for Network Drive Mappings
./Device/Vendor/MSFT/Policy/ConfigOperations/ADMXInstall/DriveMapping/Policy/DriveMappingAdmx
Copy and paste the XML content from the GitHub link above
Configure Drive Mappings
Great! Now we can configure our mapped drives. Click the Add button again for each drive you want to map:
Example: Drive Q Configuration
Drive Q
String
Maps Q Drive to a network share
./user/Vendor/MSFT/Policy/Config/DriveMapping~Policy~DriveMapping/Drive_Q
<enabled/>
<data id="Drive_Q_RemotePath" value="\\storageaccountname.file.core.windows.net\filesharename"/>
Adding More Drive Mappings
You can continue adding more mappings the same way! Just repeat the process with different drive letters (Z, Y, X, etc.) and adjust the OMA-URI paths accordingly.
Final Steps
When done, click Next and configure the assignments needed. Click Next again, configure applicability rules if needed, and click Next. Go over the settings to make sure everything is correct and click on Create.
Testing & Deployment
Ready for Production!
That's all there is to it! Now you can test using Autopilot or even on existing workstations. The beauty of this solution is its reliability and enterprise-grade approach.
Testing Methods
- Autopilot deployments
- Existing workstations
- Pilot user groups
Benefits
- Persistent drive mappings
- No scheduled tasks needed
- Enterprise-grade solution