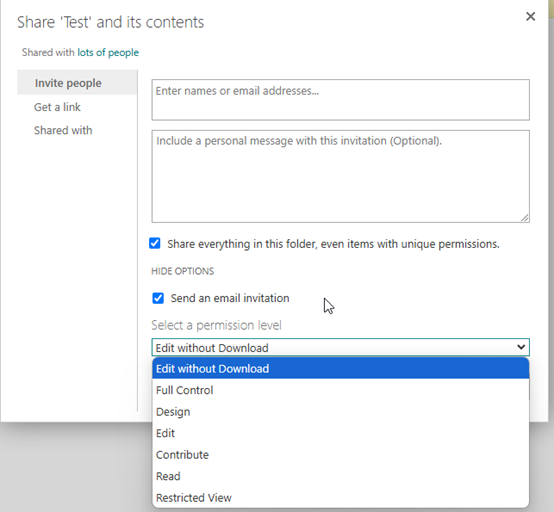
Home About Contact Latest Articles Close

How to Create a Custom Permission in SharePoint

Author: Eitan Talmi

Introduction

In this guide, we will walk you through the process of setting up a unique permission level that allows users to edit documents without the ability to download them. This specific permission setup is crucial for maintaining document security while still enabling collaboration and content modification. Whether you're an IT administrator or a SharePoint power user, this guide will provide you with the necessary steps and best practices to implement this custom permission effectively.

Phase 1: Creating the New Permission Level

  1. Run PowerShell 7 as Administrator.
  2. Run the following commands:
  3.         
    a. Install-Module -Name "PnP.PowerShell"
    
    b. Connect-PnPOnline -Url https://yourdomain.sharepoint.com/sites/test -UseWebLogin
    
    c. Add-PnPRoleDefinition -RoleName "Edit without Download" -Clone "Contribute" -Exclude "DeleteListItems", "DeleteVersions", "ManagePermissions", "ManageWeb", "AddAndCustomizePages", "ApplyThemeAndBorder", "ApplyStyleSheets", "CreateSSCSite", "UseRemoteAPIs", "OpenItems", "ViewVersions", "CancelCheckout", "ManagePersonalViews", "AddDelPrivateWebParts", "UpdatePersonalWebParts", "CreateGroups", "ManageAlerts", "CreateAlerts", "EditMyUserInfo", "EnumeratePermissions"
    

Phase 2: Assigning the Permission to a Specific Folder

  1. Choose the folder you want to set the permission on.
  2. Click on the three dots and choose Manage.
  3. SharePoint Custom Permissions
  4. Click on Advanced settings.
  5. SharePoint Custom Permissions
  6. Click on Stop Inheriting Permissions.
  7. SharePoint Custom Permissions
  8. Click on Grant Permissions.
  9. SharePoint Custom Permissions
  10. Type the username you want to share with.
  11. Click on Show options and choose Edit without Download from the list.
  12. SharePoint Custom Permissions
  13. Click on Share.